By: Larry Gilhuly, Northwest Director

Admit it. Every superintendent has been there when it comes to the use of mowers with hydraulic fluid — a drip, a narrow line or a massive blowout. Hydraulic leaks happen with every type of mower on golf courses, with the heat of the oil causing turf loss that often results in lasting visual turf loss for weeks or months, based on the time of the occurrence. Here in the Pacific Northwest we are in the “please don’t blow” phase of mowing, as any hydraulic leak at this time of the year will require months of recovery. This occurred recently at my home course due to the failure of an equipment alarm and the fact that the crew had to mow in the dark (early AM shotguns can cause problems!). Regardless of how it happened, the response by CGCS Scott Young, his assistants Mike Cupit and Jeff Jackson and the maintenance staff, may lead to a method that you can use when a similar incident occurs — without resodding or seeding. Interested? Read on for a step-by-step method to fix the damage caused by a stream of hydraulic oil from a triplex mower on a putting green.
Once the damage had occurred on two greens in late September, it was too late to seed. With the damage being just a narrow line — not more than ¼-1/2″ wide — the idea of narrow resodding was also dismissed. After putting their heads together, the group came up with a 9-step program (not as bad as it sounds!) to bring the weak areas back to normal playing condition. Full visual recovery by the end of November is expected, or approximately 6 weeks, when growth has greatly reduced. Here is how they did it.
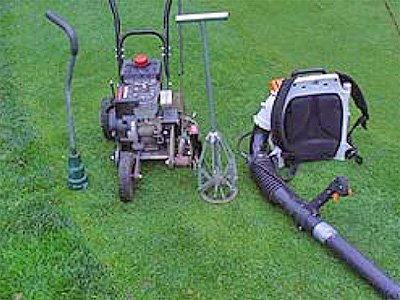
- Using a standard edger on the oil lines did not produce a wide enough line to remove the damaged area. A second blade was attached, resulting in the physical removal of nearly all of the oil-damaged lines.
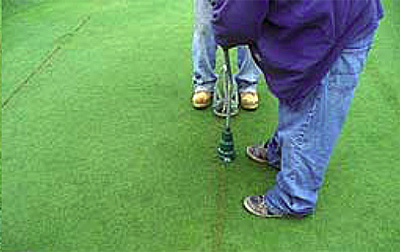
- A back pack blower removed all of the debris from the edging operation. 3. A large, 4-pronged pinching device (looks like a ball mark repair tool on steroids!) was then used to push the sides of the narrow trough that was created by the edger.
- A smaller, pincher-type ball mark repair tool with four pinching points further pushed the two sides even closer together. Note the photo shows these two units in operation.
- Sand topdressing was then applied by hand to the repaired, narrow areas to enhance smoothness.
- A shovel was used to remove excess sand.
- A broom was used to finish the smoothing operation.
- The line was rolled with a putting green roller.
- The line was mowed to remove any remaining debris.
The entire process was completed on two greens in two days. Normally, in our area, these oil lines would remain well into the next spring with the surfaces impacted both visually and in regard to ball roll. The ball roll issue was taken care of immediately, while the visual issue should be gone sometime in late November. If you have a similar type of leak on your greens, consider this hydraul-eek solution. Or, use the best solution – mow with walking mowers!
